Ask Her Out
Development Log #1

You know when your friend comes up with a brilliant idea, lets you in on it and then radio silence? Well, that's how this started. My friend needed an artist to work on his 18+ visual novel game idea but I knew nothing about them. So, while he was fleshing out the story, the characters and whatever else, I thought I'd use this time to learn about visual novels/VN games and the game engines we had available. After some research, I settled with Ren'Py.
However, I needed a short story. Something quick and doable. I tried a few short stories before dropping them due to still being long and complex for a beginner to execute. I needed something shorter, simpler and fun. Thus, spawned Ask Her Out.
I'll briefly touch on what I've learned in each section.
Software used:
| Software | Description |
| Ren'Py | Visual Novel Game Engine |
| Adobe Photoshop | Art |
| Adobe Premier | Video |
| Audacity | Audio |
| Flowframes | AI Frame Interpolation |
| Handbrake | Video Conversion |
| Xnconvert | Image Conversion |

Engine
I only managed to play one visual novel game during this time and that was Summertime Saga.
It certainly left an impression and was the main inspiration for this project, especially when it came down to the art style and the goofy nature of the main character.
Summertime Saga was made within Ren'Py which seemed like the best VN game engine for a beginner due to its ease of use and its large established community. I could have used Unity, but C# is arguably more of a learning curve than Python. Other alternatives either weren't properly supported, obsolete or weren't designed for English speakers. Ren'Py uses its own script language based off Python (basically a more dumbed down version) and had all the features I required. The more advanced your game becomes(with minigames and such), the more limitations you'll hit, requiring devs to integrate their own tools. But as a beginner it's perfect!
Ren'Py Supported Formats:
| Type | Format (ones in bold are what I used) |
| Audio | Opus, Ogg Vorbis, MP3, MP2, FLAC, WAV (uncompressed 16-bit signed PCM only) |
| Image | AVIF, WEBP, PNG, JPG, SVG |
| Video (Containers) | WebM, MKV, Ogg, AVI, various kinds of MPEG stream |
Video containers: Like a zip file that contains video streams, audio, subtitles etc. that can be read at once. It's worth reading the official Ren'Py documentation on what video and audio codecs are recommended with each container.
Folder structure and naming conventions
Your folder structure can be however you want it to be, as long as it's organised and efficient.
Folder structure example:

My naming conventions for my files and layered images are all over the place. For example, "mc_arm_neutral.webp" would be "mc_neutral_arm" in the layeredimage statement because I'm an idiot who thought rearranging it would be easier to recognise. Stick to the naming conventions you originally set out!! If it's "mc_arm_neutral.webp" keep it as "mc_arm_neutral" as an attribute or rename it to something suitable! More examples of this in the Art section.
Layered Images in the Ren'Py documentation goes into this more extensively and also gives examples of naming conventions.
Workflow
Everyone has a different workflow. My workflow was doing a bit of art, coding and dialogue at the same time while leaving audio, UI and animation for the end. Was this the most optimal/best way of working? In hindsight, no. But it worked for me. And only because I did it this way, I now know how to do it better next time. You see, way before I writ any of the dialogue, I gathered my image references and started drawing the splash intro (the PoV shot where he's staring into the phone). After finishing, I got to importing the video clips which were in MP4 format. Except, it wasn't working. Why? Ren'Py doesn't support MP4 video format. So, I converted them to WEBM video format using Handbrake which worked a treat. Always do a little bit of research before you dive in head first. Lesson learned, right? You'd think, but I messed up with the image format later in development which I'll touch upon in the Compression section.
Game flow
I don't believe there's anything remarkable about the route I've taken with this game, it's a very bog standard visual novel game with options that have consequences and ones that don't. The focus was narrative. I didn't want to overrun the game with mechanics, that route didn't make sense as an introduction. I'll probably attempt that in another VN project.
General advice:
Try to focus on what's fun rather than what's lucrative. I've had a ton of fun during this project, usually laughing at some of the stuff I was writing and drawing which got me through the sluggish periods of development. I feel like when you focus solely on what's lucrative, it tends to get boring, you lose interest and cap your creativity. That doesn't mean you shouldn't think about making money, just don't focus entirely on that. Such projects are often uninspired and end up doing the exact opposite what they planned out to do. Yes, there are a lot of exceptions but it's often abusing an existing playerbase/fanbase or a straight up scam.
Take inspiration, don't just copy or regurgitate what already exists. Transform, improve, adapt in a way that's fresh and exciting.
There will be constant change within the game like assets or dialogue being moved around or removed altogether, this is normal. If something doesn't feel like it fits anymore but you've spent so much time on it, it's probably best to remove it or even repurpose it. Right till the end, I was still changing and adding new stuff but had to stop myself otherwise it would have dragged on. I still think there are things that I would change now but it was a good call to stop here. I guess that's the beauty of game updates, I can add/remove changes whenever I want.
It will take time to learn everything, know this. Don't rush. Development for this short game took about 10 months on/off. The art used up the most time. You'll start off slow then eventually pick up pace.
Okay but, how did you actually learn to use Ren'Py? Google is your friend! Well... maybe not so much anymore. But, point still stands. Start off with YouTube tutorials and then resort to your search engine for the rest. Focus on the basics first before you dive into the more difficult mechanics.
Here are some channels/websites that helped:
YouTube:
| Title | Link |
| Visual Novel Design | https://youtube.com/@vimi |
| Zeil Learnings | https://youtube.com/@ZeilLearnings |
| __ess__ Ren'Py Tutorials | https://youtube.com/@essRenPyTutorials |
| Game Developer Training | https://youtube.com/@GameDeveloperTraining |
| Coding With B and E | https://youtube.com/@LearningWithBandE |
| Wulfmune | https://youtube.com/@coffeedripstudios |
| SwedishGameDev | https://youtube.com/@swedishgamedev |
| Timitu | https://youtube.com/@Timitu |
| Mime Media AS | https://youtube.com/@mimemedia |
| Kia Azad | https://youtube.com/@KiaAzad |
Other:
| Title | Link |
| Ren'Py Official Documentation | https://www.renpy.org/doc/html/index.html |
| Lemma Soft Forums | https://lemmasoft.renai.us/forums/ |
| Ren'Py Reddit | https://www.reddit.com/r/RenPy/ |

There's a lot I can write about this, but I'll keep it as brief as possible.
I had a rough idea what the story was about after writing the intro dialogue in Word. About a quarter way in, I had a better understanding of the direction the game was heading but still had no clear vision of where it would end. Essentially, I was improvising while developing and made up/added things as I writ. Days/weeks pass, ideas started to flow, indoors, outdoors, shopping, gatherings etc. so make sure to always be writing them down. I eventually dropped writing/planning everything out in Word and relied on my phone's note app, Notepad and VSCode (as I was developing), so figure out what works for you. Within VSCode I'd include comments on their expressions and gestures for future reference on the art required for that scene and what I was trying to convey.
The dialogues changed all the time. I had to cut a lot of it, move it around, swap between the characters etc.
Even though the story is short, be conscious of how much you're writing because you'll have to match that with art especially if you're going the same route as this game. More dialogue = more art = more time.
How the dialogue came about? Well, I mostly drew inspiration from life. For example, Amelia's conversation about Suzume (2022) was parts of the discussion my mates and I had after watching it. Another example is Robyn's rant about the camming industry was partially about my frustrations with the creative industry. I simply put a spin on it after realising you can just about apply the same logic to any industry. Dolores, um, well... Dolores. That was never meant to go anywhere at first, very wholesome ending in fact. But I remembered that one scene in Misfits with Nathan (Robert Sheehan)... and the rest was history.
I was also thinking about what would make my friends laugh and there are a few in-jokes just for them.
So, yes, I planned some parts and other parts just happened along the way. Well, actually most of it just happened along the way but you get the gist.

Gather plenty of references!
Sketch out the scenes and characters as blobs, stickmen or scribbles with words around it and pop them into Ren'Py as placeholders before getting started on any art. This is the most efficient way of going about it because if you create a fabulous drawing and it turned out you no longer needed it, you've wasted valuable time. Did I follow this rule throughout? No. But I did when I needed to. It helps get a better idea of how the scenes will play out, the timing of the cards, the positions and sizes of the characters in relation to one another etc.
Don't do everything on a single layer. Separate the different parts of characters (arms, expressions) and environments (objects, structure) into different layers. So, if you wanted to use them in the layered image statement, as image buttons or wanted to make changes in the future (destroyed version, objects removed, eye iris in a different position etc.) you wouldn't have to redraw it all (unlike someone here...).
The style you choose is preference based, do whatever you feel works. Just remember to keep it consistent throughout, which I struggled to do by the end but that was simply just a byproduct of my art improving and growing confidence. I mostly used the default Photoshop Hard/Soft brushes. Brush size was 12 and lower. I think the line weight was mostly the same, until later development where it started to shift from a cartoony style to a slightly realistic. I used mostly basic shading with a little bit of ambient occlusion shading. It started off difficult but became fairly easy after a couple of characters.
If you're an artist worried about being "good enough", don't be. You'll probably never be with the standards you've set for yourself. But will be good enough for everyone else. My art is littered with mistakes but it's good enough for what I needed to achieve. If I waited until I was the same level as those I look up to, nothing would ever get released. You will improve during the project so it's a win win. I've seen improvement in form, rendering and line weight. If you've been sitting on an idea that you're waiting to get "good enough" to execute, don't wait. Start now.
If you're not an artist, sketch out the idea. Then find an artist. Nowadays, there's an abundance of hungry, starved artists with something to prove and will just about work on anything if you throw em' a bone.
UI
You take everything from the GUI folder and make it your own. I only really touched the size of the textbox and kept the size of everything else the same. Added a thin outline with some layer effects, used Smart Sharpen and then made it black/white if I recall correctly. Kept it all relatively simple and consistent, didn't want to play around with it too much.

Character Art
I mostly stuck with the very first rendition of each character, aside from the main character. They mostly came out how I imagined them so there was no need to change much. I tried to match their personality with their style and colour schemes.
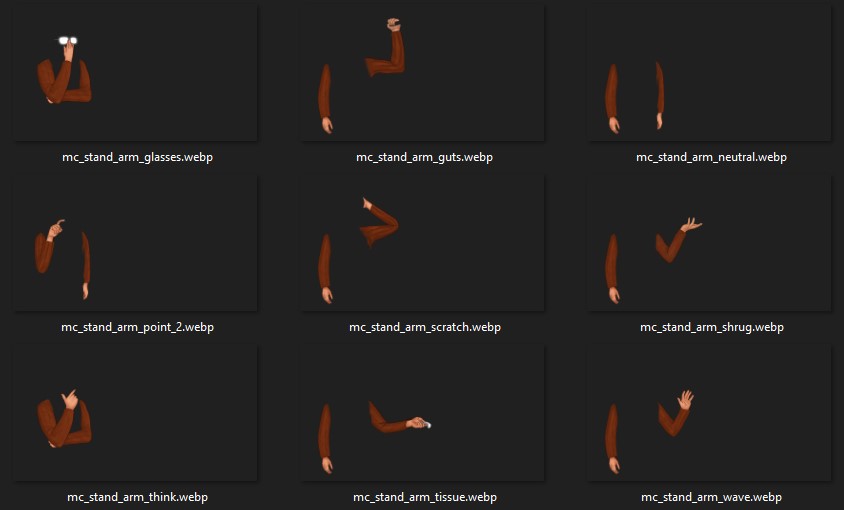
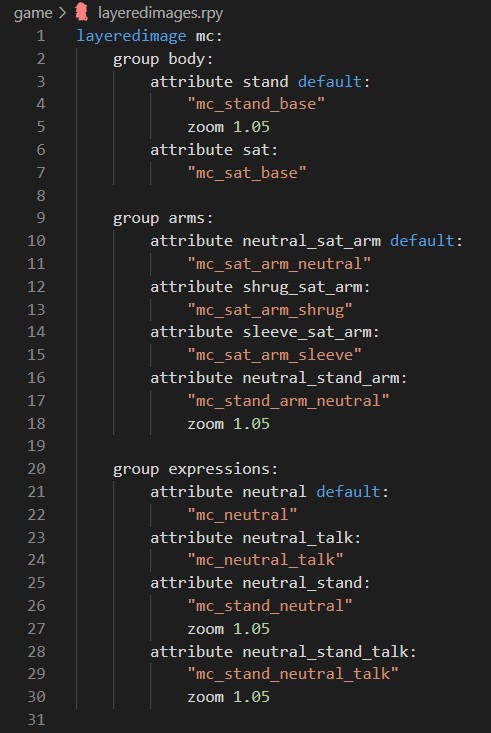
When it comes to "posing" (change of arms, expressions etc.), this was how I had my characters setup:
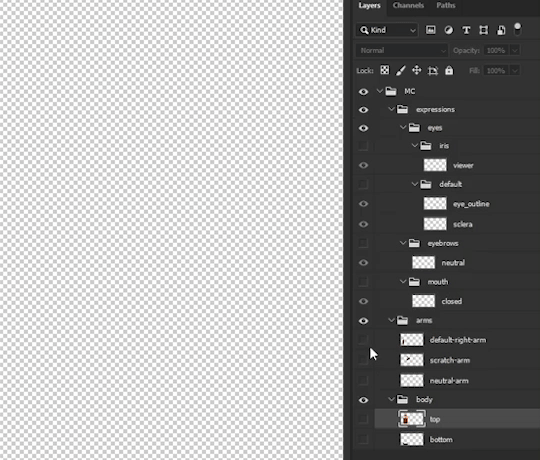
It's up to you whether you separate the head from the body (if you want to change heads or its position) but I had them merged as one.
Some arms I had to blend into the body using soft brush, other times I had to erase the arm so it wouldn't overlap the body since the arm is higher in the hierarchy for Layered Images. This probably won't make any sense until you've actually used layered images. It's also different case by case basis, you'll know where you need to blend/cut away parts for your characters.
Environment Art
I can't really talk much about this section because environment art defeats me. It's something I definitely need to spend more time on learning. The best advice I can give is to break everything down into simple shapes and focus only on using one and two point perspectives. Think of fairly easy to draw environments. It'll look boring and seem incredibly generic at first but it will slowly come into form and you'll add your own flavour by the end. Also, take caution to the scale if you're going to use interactable buttons.
Animation
Ren'Py does not support animated GIFs. So, you'll either have to use a video format or have a sequence of images that will animate in Ren'Py with a couple of lines of code.
Animation is still something I'm looking into. I see a few projects on this site use Live2D, which could be an option.
Photoshop's Puppet Warp + Flowframes is what I used.
After doing about 4 frames of Photoshop Puppet Warp on my still image, I used Flowframes to interpolate more frames. I selected 12fps, but the most it could output was another 3 more frames, making 7 in total which was fine.
Flowframes settings are based on your GPU. I just went with whatever's recommended and the latest AI model. However, there will be artefacting which you're going to have to cleanup in your image editing software.
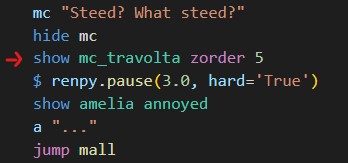
Animation code example:

You would include repeat at the end if you wanted to loop the animation. Then you'd do show mc_travolta to call it.
I guess Layered Images also fits into this section even though it's not really animating.
Layered Images code example:
Layered Images in action:
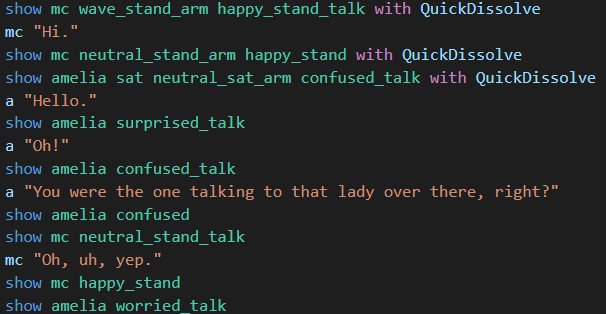
And you'd do the same for each character. You can also add your own group before or after. A group that comes after another will overlap the previous ones. So, be conscious of how you blend or cut your characters.
Some attributes have zoom 1.05 because the main character appeared too small in contrast with the others, so I had to increase his size.
There's a total of 2 body, 16 arm and 35 expression attributes for the main character alone (for the standing version, which would double for the sitting version unless you use style properties and reposition already existing images which is recommended).
The opposite arm is rarely utilised, I should have created two groups: group right_arm and group left_arm instead of every arm image having the character's right arm present, I could have just had it always shown using 1 image file. This would save some kilobytes.
Look into zorder if you want your character to appear in front/behind an object.
Towards the end, I got a bit lazy with the posing, especially with Robyn. She doesn't have nearly as much arm movement or expressions as the other girls. I had many planned, just didn't execute. Maybe I'll add more in the future.
Art guides:
| Title | Link |
| Summertime Saga Streams (for understanding the full process of going from Photoshop>Renpy) | https://youtube.com/@SummertimeSagaStreams |
| Art tutorial for the intermediate painter (suggested by DarkCookie) | https://www.androidarts.com/art_tut.htm |
| Jaykittens BG Q&A (for help with backgrounds) | https://docs.google.com/document/d/1VZNkJ5iRLpamadxZD8BNF0V9Ci4k2-g6SRPdYw6I_wQ/... |
| Basic/AO Shading by Marc Brunet (if you want to achieve something similar to AHO) |
Don't be discouraged by the length. Yes, it can get boring but it will help a ton. Skim through whatever's relevant to you and check back every now and then when required.

You can do everything inside the script.rpy file or if you want to keep things more organised, you can create new .rpy files and call on them. I don't know what's recommended, but I had separate files for different sections of the game, like the mall section and toilet section had different .rpy files, there was one for just animations, one for image buttons, each character had their own file for their dialogue, so on and so forth.
The code itself is an absolute mess. There are so many if statements when I should have been using elif. There are some things that only work because I left a comment in? What the... Honestly, as long as it works right? I should've gotten help with this section since coding escapes me but I'm too stubborn to ask for help. While I still don't understand half of what I'm writing, I understand the patterns and know what to place where when required. But it's very barebones. I think as you're starting out, the basics are all you're going to need anyway so don't stress about coding if you've never coded before. It's fairly simple in Ren'Py and a lot of it is trial and error. You'll grow sick of those "An exception has occurred." pages but I promise you'll get through it. A lot of the questions you'll have and features you'd want to implement are already out there, it's just copy, paste and rearrange.
If you already know how to code, what the hell! Get outta this section! Shoo!

Now, I only really focused on audio right at the end. I had some idea of the sounds that would play like the phone click, explosion, some of the music but I was pretty much a deer in the headlights for audio. I used Audacity to edit the tracks, mostly controlling the gain levels but also merging tracks together and cutting them.
As I was slowly looking for copyright free, royalty free and whatever else free soundtracks, I underestimated just how important and how long this section of the game would take. I assumed I'd pop in a few tracks here and there and voila! I wish... It was incredibly hard finding the right music. I kinda had a rough idea what genre or song I'd choose but I had difficulty imagining the many other sounds like I would an image, since I'm no musician. I severely underestimated audio. You also have to research the many different licenses available, whether you need permission from the creator, whether you need to credit the creator, whether you can edit the tracks, whether it's for public use, how the license changes when you monetise your game etc.
Summertime Saga didn't have any background music at the time I played it, so I'd put on lofi to remedy this. This was why lofi was used for the mall.
There's sooooo much you could do with audio which I regret to leaving till last. I just never knew. I think I'd like to play around with voice lines in future work since there's a very efficient way of going about it within Ren'Py.
The important thing to remember are your dB levels which can be controlled with the Gain slider. Make sure it's not too loud!! Keep it consistent!
My Audacity Settings (right-click>Open Image in New Tab):
 | Playback Level, top right centre above the track. I aimed to keep the volume level within the -24 to -12 level. |
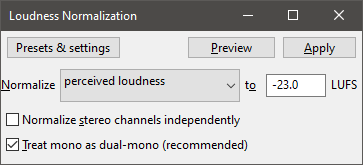 | Effect>Volume and Compression>Loudness Normalization... This would be the first thing I'd do. The default settings are fine. If it makes the sound louder, I wouldn't bother with it. Manually change the gain in this case. |
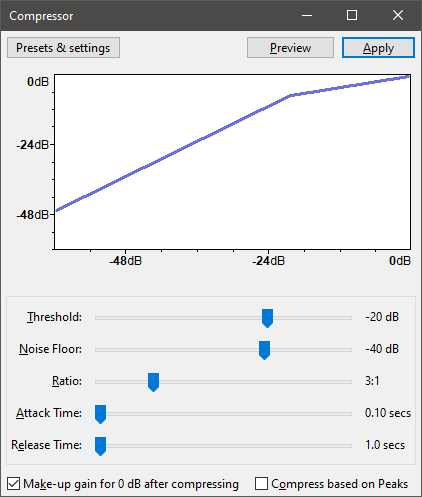 | Effect>Volume and Compression>Compressor... This is optional. I didn't really use this or benefit from it much but you might find some use for it. |
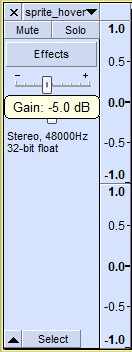 | Gain slider, left hand side of the track. I usually stuck with -5.0 dB for most tracks, there were a few outliers which required -20.0 dB or even an increase in Gain. |
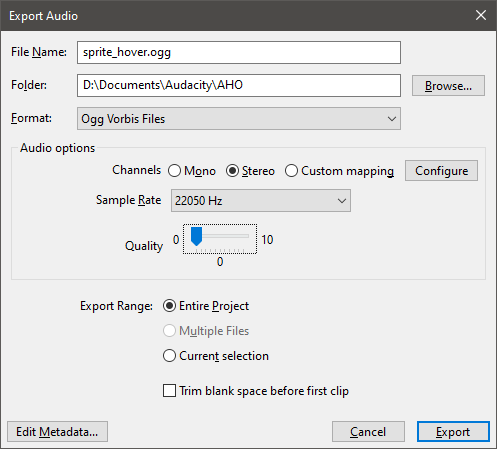 | File>Export Audio I've found that dropping the Quality slider to 0 barely makes a difference in the audio quality strangely enough, or I'm deaf. It saves quite a bit of file space too. Now, what does affect the audio quality is the Sample Rate. 22050 Hz Sample Rate worked for most tracks with only a little bit of quality dropped and a ton of file size reduction. 32000 Hz, 44100 Hz and 48000 Hz for more important tracks like intro/outro themes, character themes or location themes. Don't go below 16000 Hz, that's where you'll truly suffer. |
 | This is for Ren'Py. I placed this at the end of options.rpy but it doesn't matter where you place it. This put my game's volume slider to 70%. The value 1.0 would put it at 100%. |
Where to get audio:
| Title | Link |
| Freesound | https://freesound.org/ |
| Musopen | https://musopen.org/ |
| DOVA-SYNDROME | https://dova-s.jp/EN/ |

The initial build size: 300MB
Final build after compression: 85.4MB
I definitely could've shaved off a bit more had I planned this out earlier but this will suffice for now.
This section is very important. Weirdly enough, I love optimisation even though it can be tedious for some, it's definitely worth it.
Did I think I needed to compress a visual novel game made up of images, video and audio? No. But turns out that, yes, in fact, you do.
I had always planned on making this a web build. I love the idea of playing games without having to download anything. Especially with WebGPU on the horizon. But when I tested out the build, the images would load pixellated and some parts of the game such as the audio didn't load at all when it would in the Windows build.
To fix the pixellation, you need to change the + sign in your progressive_download.txt file in your build folder to -. This makes sure your everything loads before the game starts instead of loading only when it's required. I believe this is only feasible for smaller games otherwise a larger game will having a longer initial load time but I haven't tested that out yet. You can learn more about HTML5 and Progressive Download in the link below. Also look into ByteCode Cache in the same link.
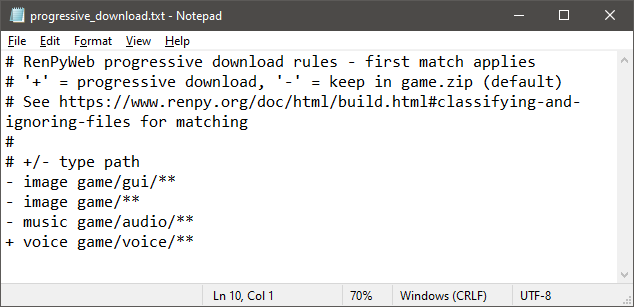
Didn't do game/voice/ because my game doesn't have voice.
A problem with the web build which I couldn't fix was the unlimited character name input, even though the limit works in the Windows build. I don't know how to fix this.
I chose 1920x1080 (16:9) resolution which in hindsight I should've gone smaller, like a 4:3 resolution so I wouldn't have had to draw as much, saved some file space and fully utilised the screen space.
Check your folders and delete/relocate anything that shouldn't be in there. I had a few PSD files and old PNGs that I forgot about.
If you need the same image but in a different position, use the Position Style Properties such as xpos/ypos. For example, you have the character's arm when they're sitting down but now they're standing up and you need to move the arm, style properties is the way. You'll have a less overall file size, less lines of code to write and less images to load. What I did because of laziness was reposition it in Photoshop which created another file and used more file space... 🤦♂️
Ren'Py now supports AVIF format from version 8.1 onwards. There's a link below that describes the advantages of using AVIF compared to other image formats.
I used XnConvert to convert all my PNG files to AVIF but there were issues with the colour space and transparency, so I had to settle for WEBP image format which still saved a ton while maintaining good quality. I reckon had I initially exported my images as AVIF I wouldn't have faced these issues. So, for future projects, AVIF is the way. Until JXL gets wider support anyway.
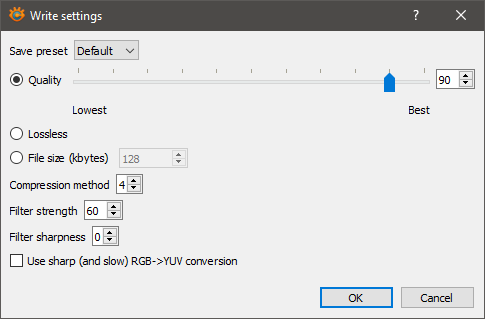
90 was good enough for the most part. I had to bump it up to 95 or 98 for some art. You can go Lossless but it's only reduced by 20-30%.
Lossless compression: Original data is not removed but rearranged to become more efficient. File size is generally less than the original but larger than lossy.
Lossy compression: Some of the original data is removed from the file.
Links:
| Title | Link |
| Ren'Py Web/HTML5 | https://www.renpy.org/doc/html/web.html |
| Learn about JXL/AVIF | https://github.com/renpy/renpy/issues/3865 |
Conclusion
That's all I can think of right now, hope it helped.
I'm new to this and still learning, just made a Patreon that's very barebones so if you wanna support go for it bruv but if not, thanks for reading!

In the meantime... there's a ton of interesting projects on here that I'm gonna check out. Epic Games also dropped Doki Doki Literature Club for free too, might be time to give it a go.
Au revoir!
Leave a comment
Log in with itch.io to leave a comment.